|
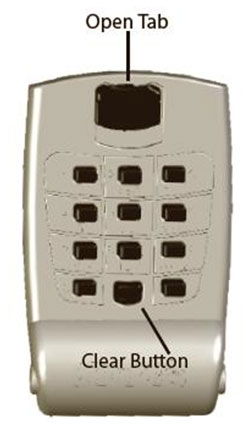
1. On front
of KeyGuard Pro between 0 and * key there is a clear button.
KeyGuard Pro does not come preset to any combination. For best
security choose a combination between 4 and 7 numbers and/or
letters.
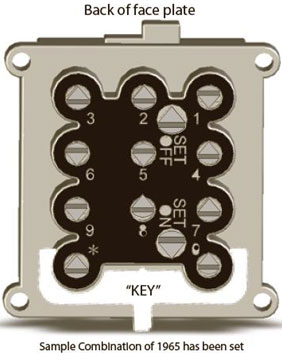
2. The first
time you set combination, press clear button down and release to
clear combination and then push down on open tab. The KeyGuard
will open, exposing back of faceplate. There are 11 yellow buttons
with arrows pointing up towards top of KeyGuard Pro. Below
arrows there are corresponding numbers to front of door. If using a
lettered combination, now find corresponding numbers.
3. At the
bottom of the faceplate back (see image on reverse side) there is a
white plastic “key” to change combination on the KeyGuard Pro. A
small screwdriver can be used as well. With this key, push in
the desired button and turn 180 degrees. The arrow on the button
should now be pointing down towards base of KeyGuard Pro. This will
be done for each letter and/or number in desired combination.
4. Double
check combination to make sure it is set properly. Remember each
button that is activated with the arrow pointing downwards
represents part of combination.
5. Test
combination before closing face of KeyGuard Pro. Press clear key,
select the combination and pull down open tab to open. If tab pulls
down combination is set correctly. If it does not pull down, DO NOT
CLOSE THE COVER. Check arrows again to make sure the correct
ones are activated
6. To use
your key box, press clear each time it is used. Then enter in the
combination and pull down on the open tab.
7. To close
KeyGuard Pro, put in combination and pull down open tab. Close
front face and release open tab. KeyGuard should now be secured in
the locked position.
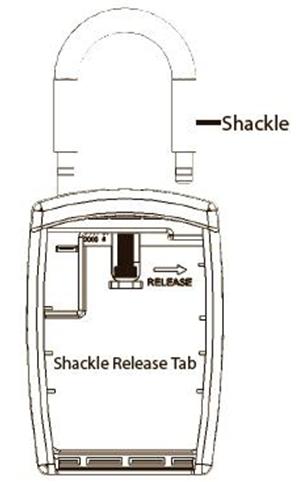
8. The
shackle can only be released when lockbox is open. To release
shackle push shackle release tab (see image) to right.
Shackle is secured automatically when closing shackle.
9. The
KeyGuard Pro offers ability to use an optional, small ¾” wide
padlock that can be placed through the loop on release tab. This
option, if desired, prevents others from removing lock box once key
door is open.
 |